![]()
![]()
ISDN problems can be troublesome. Normally these occur during ISDN line installation. Improper line settings (translations) or incorrect Service Profile IDs (for NI-1 or DMS-100 ISDN lines) are often the source of the problem.
ISDN problems can also occur with long distance carriers. Some carriers have extensive clear channel trunks around the world. Some only have 56 kbps restricted trunks to certain regions or countries. And sometimes, during busy hours, you may be routed over a restricted 56 kbps trunk even if you have in the past made 64 kbps connections using this same carrier.
Finally, there are those hard to nail down "intermittent problems". These may be due to several causes, including routine phone company maintenence on a switch, defective loop extension hardware (BRITE cards), Network Terminators, or Terminal Adapters.
A thorough test program will involve four components:
1. Testing your local loop.
2. Testing a remote connection with the far end (with you making the calls to the far end).
3. Testing the far end local loop.
4. Testing a remote connection with your end (with your remote colleague making the calls to your end).
Diagnosing the Local Loop:
Most of the Local Loop problems can be diagnosed with the use of both the ISDN Tools application and the appropriate Control Panel. For the following examples, we show screen shots taken from the Planet Control Panel. The ISDN GeoPort and ISDN H.320 board Control Panels provide similar information.
Open the Control Panel by clicking on the icon in one of the ISDN Tools windows:
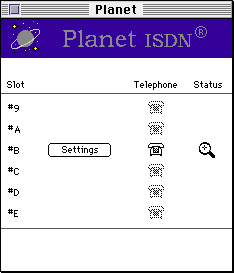
Initial Planet Control Panel Screen
The Planet Control Panel will show you the slot in which your board is installed. You will need to input the proper ISDN settings in the Control Panel if you haven't already done so. For Custom 5ESS ISDN lines this is just your single ISDN telephone number (and even this is optional). For NI-1 or DMS-100 ISDN line users you MUST enter the two Service Profile IDs (SPIDs) which were given to you by your phone company representative.
Click on the small magnifying glass beneath "Status" to display detailed information about the state of your ISDN line:
For Custom Point-to-Point 5ESS users, the Control Panel will look similar to this:
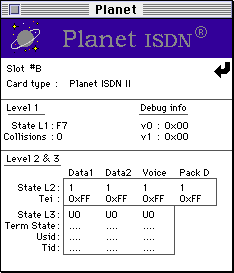
Details of Planet Control Panel for 5ESS Point-to-Point ISDN line
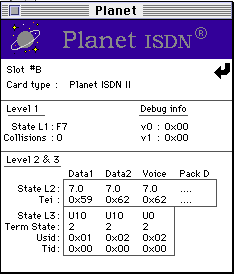
There are two important groups to watch here. The first group is the "Tei" row beneath the State L2 heading. When the Planet Board is reinitialized (during startup), it may not yet have obtained a Tei (Terminal Endpoint Identifier) from the central office. You might first need to attempt to place a call before the switch assigns a Tei. With the ISDN Tools application, place a call to your second B channel (the same ISDN phone number). You should see the switch assign a Tei and the State L3 should proceed quickly from U0 (disconnected) to U3 (call progress) then U10 (connected). IF you have ordered an ISDN line with voice capabilities, you will also see a Tei assigned to both the Data2 and Voice channel. Otherwise these will remain at 0xFF. The "Pack D" (D channel Packet) Tei will remain at 0xFF (since D channel packet capabilities are not enabled for use in the USA...what a shame!).
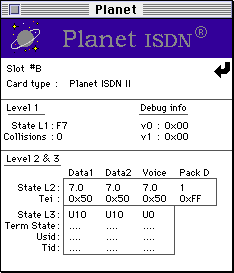
Call Completion State for 5ESS Point-to-Point ISDN line
For NI-1 or DMS-100 users, the Planet Control Panel should look like this:
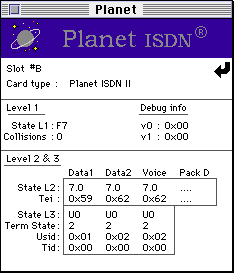
Details of Planet Control Panel for National or DMS-100 ISDN
line
The first important values to examine are the "Usid" and "Tid" fields below the State L3 heading. The central office switch should have assigned valid values for these entries. They SHOULD NOT be 0x7F nor 0x3F, respectively. If they are 0x7F and 0x3F, and you have valid Tei values (a valid Tei is any hex value except 0xFF), this means that you do not have the correct SPIDs entered in the Planet Control Panel settings. Here is an example of the Planet Control Panel with INCORRECT SPIDs:

Planet Control Panel with Incorrect SPIDs
Once you have confirmed that you have valid Usids and Tids, you can place a call from the first B channel to the second B channel with the Planet Tools application. You should see the L2 State change from U0 to U3 (call progress) to U10. The B2 channel (Data2) should also go to the U10 state. The Planet Tools application will then proceed with sending data between the channels and testing the line.
Call Completion State for National or DMS-100 ISDN line
Note: if you have not ordered voice capabilities on your ISDN line, the Tei beneath the Voice column will remain at 0xFF.
Once you and your colleague have successfully completed Local Loop tests, you should Diagnose Remote ISDN Problems with the Remote Client/Server tests.
Diagnosing Remote ISDN Problems:
Either you or your colleague must use the Remote Client and the other must use the Remote Server modes of ISDN Tools. After setting up the respective test modes, place the appropriate call(s) to the far end. You or your colleague should see the 1st B channel connect, then the second B channel connect (you may wish to monitor these connections with the proper Control Panels).
If the call(s) cannot be completed, try the following:
1. If the remote end resides within your local calling area, try dialing with a 10 digit phone number (i.e. include the Area Code). If this does not help, try making the call(s) with the 56K Rate Adaptation boxes checked (both of you must check these boxes).
2. If the remote end requires use of a long distance carrier, try the call(s) using a different long distance carrier. If you have a Planet Board and voice capabilities on your ISDN line, you can determine your "default" long distance carrier by attaching a phone to the back of the Planet Board and dialing:
1-700-555-4141.
You should be connected with an automatic audio server which indicates your default carrier.
You can then manually select any other carrier by including the carrier's PIC (Primary Interexchange Carrier) code in your dial string. PICs for the major three long distance carriers are:
AT&T: 10288
MCI: 10222
Sprint: 10333
Examples:
Without PIC (normal calling): 1-408-555-1515
With AT&T PIC (selected carrier calling): 10222-408-555-1515
If you find that you can complete the call(s) when you manually select a carrier, and this is a connection which you often use, then you may wish to have your default carrier selected to this carrier. Contact your phone company representative, or better yet the long distance carrier (who may pay for the cost of the switch over and even offer you some special rates), to make the change permanent.
If All Else Fails
If you continue having problems with your ISDN line which you can't seem to solve, Quicomm is here to assist you. Our phone consultation rates are very reasonable and we can normally determine the cause of the problem in less than an hour. You should have your ISDN line type and SPIDs (if you have a NI-1 or DMS-100) available for consultation. We can be reached at 407 363-9750.